My technical skills
My favorites
My picture album
Shortcut keys
My code library
VB resources
SQLServer resources
SQLServer books
Replication FAQ
Scripting resources
ASP resources
Search my site
Sign my guestbook
Contact information
SQL Server Articles New
| Want to keep in touch with the latest in SQL Server world? Email vyaskn@hotmail.com with 'subscribe' in the subject line |
Making SQL Server 2005 Integration Services Packages Portable
See also: SQL Server Data Transformation Services (DTS) Best Practices
Many of us have used UDL files (Universal Data Link files) in SQL Server 2000 Data Transformation Services packages (DTS packages). UDLs allowed us to make our DTS packages portable.
This is how it works in SQL Server 2000 DTS: Use UDLs for representing connections to SQL server; and when moving that DTS package from one environment to another (or from one server computer to another), simply edit the UDL file so that it points to the new SQL Server. This allows us to move packages freely without us having to edit the packages. We just need to edit the UDL files. To get this setup working, you simply need to store your UDL files in standard folder (for example, F:\UDLs) on all your servers.
In SQL Server 2005, "Integration Services" replaced DTS. SQL Server Integration Services (SSIS) is a completely new ETL (Extract, Transform and Load) framework, and is much more powerful than DTS. But unfortunately, Integration Services packages in SQL Server 2005 have no support for UDLs. You just cannot use UDLs in SSIS packages.
Instead, SSIS introduced a feature called "Package Configurations". Package configurations allow us to make SSIS packages portable and help us change SQL Server and file connectivity information dynamically. The "Package Configuration Wizard" allows us to create package configurations.
SSIS provides the following package configuration types:
Out of all the above options, I found the "XML configuration file" option more flexible and less intrusive. In this article I am going to explain how to get this approach working effectively.
Creating XML Configuration files:
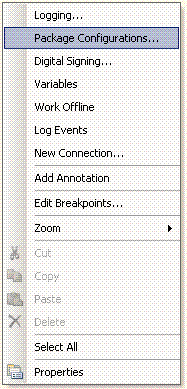
1. In the “Control Flow” tab, right click on the design surface and select “Package Configurations…” from the pop-up menu.
2. Tick the check box “Enable package configurations”
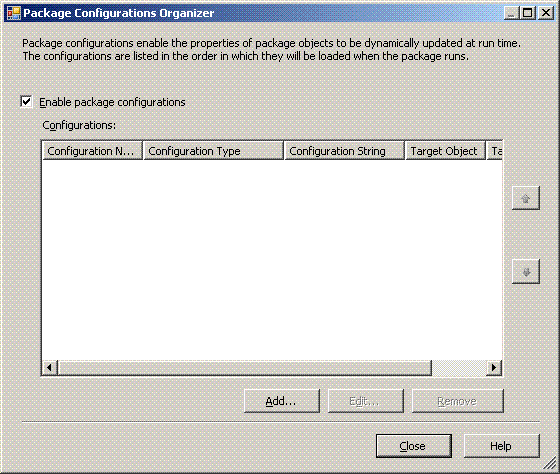
3. Click the “Add…” button, to open the “Package Configuration Wizard”
4. In the “Configuration Type” combo box select “XML Configuration File”
5. Click “Browse…” to select a location for the XML configuration file
6. Specify a file name in the “Select Configuration File Location” dialog box and click Save.
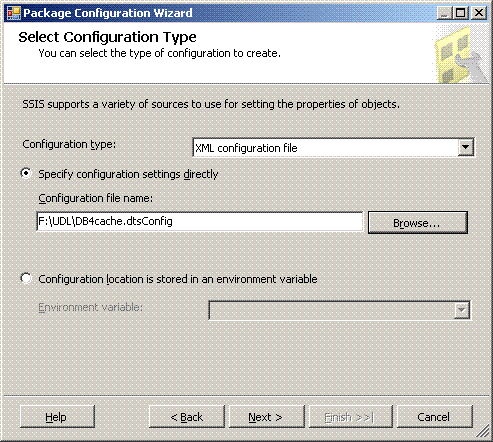
7. Click “Next” in the package configuration wizard
8. In the “Objects” tree structure, tick the objects for which you want to generate the configuration file, and click “Next”
9. Provide a name for this configuration and click “Finish”
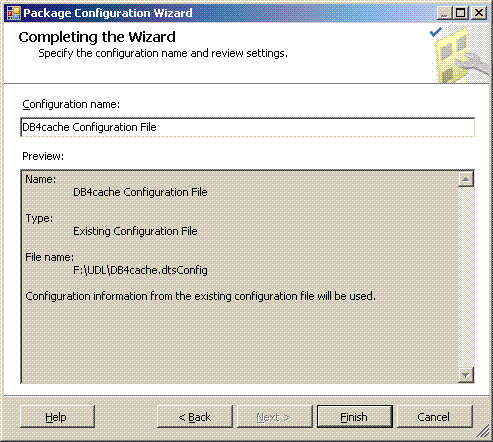
This is a one off process for each server and database combination. Once a configuration file is generated for a connection, it can be reused in all other SSIS packages. This XML configuration file can be edited in Notepad or any XML editor, to change the server or database names. Once the configuration file is changed to point to a new server/database, the change will reflect in all SSIS packages that are using this configuration file.
You don’t necessarily have to go through the above steps (1 to 9) to create a configuration file for a connection. The following XML is all that is required for creating an XML configuration file:
<DTSConfiguration>
	<Configuration ConfiguredType="Property" Path="\Package.Connections[SERVERNAMEdbname].Properties[ConnectionString]" ValueType="String">
  		<ConfiguredValue>Data Source=[SERVERNAME];Initial Catalog=[DATABASENAME];Provider=SQLNCLI.1;Integrated Security=SSPI;Auto Translate=False;</ConfiguredValue>
  	</Configuration>
</DTSConfiguration>
In the above XML fragment, notice the parts in bold. These are the only things you need to change. SERVERNAMEdbname is the name of your SSIS connection. [SERVERNAME] is the name of SQL Server you are connecting to and [DATABASENAME] is the name of the database that you are connecting to. Use the above XML fragment as a template for SQL Server connection configuration. This is the bare minimum XML that you need. If you generate the same configuration file using the package configuration wizard, you will see a lot more nodes and attributes in the generated XML, but all that is not required.
To use an existing XML configuration file in your package, in step 6 (above), select the existing configuration file, and when prompted, select “Reuse Existing”.

Guidelines on using XML configuration files in SSIS:
Connection and XML configuration file naming conventions: When creating a new OLE DB database connection, use the following naming convention for your connections:
SERVERNAMEdatabasename
Note: You will have to rename your connection in the connection manager, after the connection is created.
For example, a connection to a server named LDNSrv1 and MyDB1 database should look like:
LDNSRV1mydb1
Notice that the server name is in CAPS and the database name is in lower case. However, this is just a guideline, and feel free to go with the naming convention that you are comfortable with.
Remember to follow the same casing standard everywhere, as SSIS connection names are case sensitive.
Use the same naming convention for the XML configuration files. Make sure your XML configuration files have the .dtsConfig extension. By default SSIS looks for this extension. But any other file extension will work too.
For example, the XML configuration file for Nyk1 server and Stocks database should be named:
NYK1stocks.dtsConfig
Managing XML configuration files: Store all the XML configuration files in a standard location on all servers. For example, at F:\UDL folder
Create a separate XML configuration file for each server and database combination. This approach is better than storing multiple server configurations in a single XML file. The reason being, if you need to edit connectivity information for a single server, you will directly edit the XML file for that server only. This reduces the chances of accidentally changing information for other servers.
If you are connecting to more than one server in your SSIS package, add the relevant XML configuration file for each server and database combination. You can add multiple configuration files from the “Package Configurations” screen, as shown in the below image:
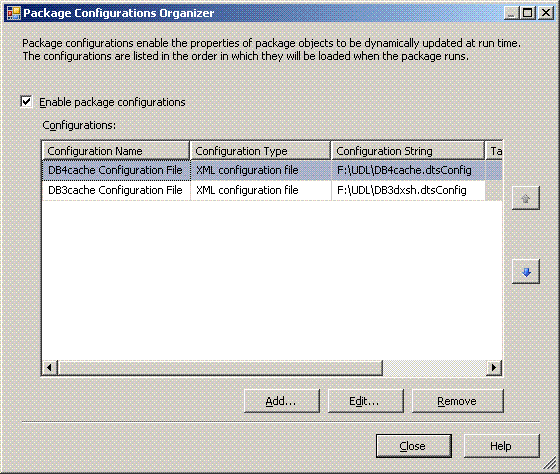
For example, if your package is connecting to Srv1.db1 and Srv2.db2, then you would add the following XML configuration files to your package:
SRV1db1.dtsConfig
SRV2db2.dtsConfig
Always reuse existing XML configuration files, if one exists for your server and database combination. This is the sole reason behind configuration files, as you will have to update connectivity information in only one place. If there isn’t a configuration file already created for your server and database combination, create a new configuration file using the below templates and follow the described naming convention.
For Windows authenticated connection to SQL Server:
<DTSConfiguration>
	<Configuration ConfiguredType="Property" Path="\Package.Connections[SERVERNAMEdbname].Properties[ConnectionString]" ValueType="String">
  		<ConfiguredValue>Data Source=[SRVNAME];Initial Catalog=[DBNAME];Provider=SQLNCLI.1;Integrated Security=SSPI;Auto Translate=False;</ConfiguredValue>
  	</Configuration>
</DTSConfiguration>
For SQL Server authenticated connection to SQL Server:
<DTSConfiguration>
	<Configuration ConfiguredType="Property" Path="\Package.Connections[SERVERNAMEdbname].Properties[ConnectionString]" ValueType="String">
  		<ConfiguredValue>
			Data Source=[SRVNAME];Initial Catalog=[DBNAME];User ID=[LOGIN];password=[PWD];Provider=SQLNCLI.1;Persist Security Info=True;Auto Translate=False
		</ConfiguredValue>
	</Configuration>
</DTSConfiguration>
Note: In the above templates, square brackets [] are not required except around the name of the connection. Do not surround server name, database name, user name and password with square brackets
Populating global variables using XML configuration files: When dealing with Active directory shares or file paths (for connections to source and target text files or data files), do not hardcode the domain names or machine names. Instead, use variables. These variables can be populated from the XML configuration files. Once a variable is created in the SSIS package, its value can be populated from the XML configuration file. For example, here’s what you need in the configuration file, to populate the variable called Domain with a value of "NykLive":
<DTSConfiguration> <Configuration ConfiguredType="Property" Path="\Package.Variables[User::Domain].Properties[Value]" ValueType="String"> <ConfiguredValue>NykLive</ConfiguredValue> </Configuration> </DTSConfiguration>Note: Variable names are case sensitive too. So make sure you follow the same case when referring to the variables in the configuration files, script tasks etc.
Downloads
Click here to download the XML configuration file template for connecting to SQL server using Windows authentication
Click here to download the XML configuration file template for connecting to SQL server using SQL Server authentication
Click here to download the XML configuration file template for populating SSIS variables
See also: SQL Server Data Transformation Services (DTS) Best Practices
SQL Server 2005 Integration Services Books / SSIS Books